Thursday, November 29, 2012

Thursday Random: Christmas time is my favorite!!

So Christmas is just right around the corner and it's getting here quickly.  I am not ready for the gift aspect of Christmas, but I am ready for the family part.  Spending time with family during the holidays is my favorite thing ever. Every year I decide to make my Christmas gifts instead of buy them, because I feel like homemade gifts are way more special than store bought gifts..(plus, I am so broke..it's no joke) And I of course decide to make these gifts a month before every single year..sometimes I wish I could get one of Santas elves to come help me out to get them done faster. For this Christmas post I decided to share some beautiful winter photos I have found on Pinterest, plus add some Christmas gift DIY's (another strange thing, is I am looking forward to some snow this year, but of course I want it when I have no where to go..that's when it's the prettiest).....Merry Christmas Everyone!!


Anyone that knows me personally, knows that I absolutely hate snow..but...this year I am ready for it..this is too gorgeous!

Comfy Cozy

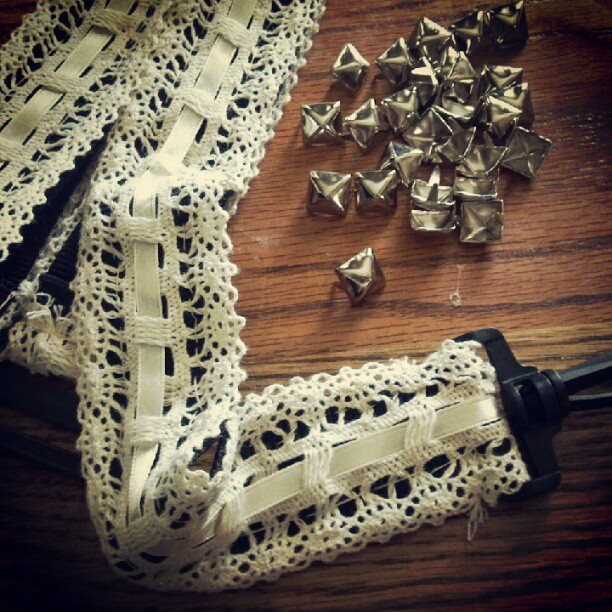
Cute little Christmas Mobile DIY   http://blog.freepeople.com/2012/11/diy-holiday-mobile/   click on the link to learn how to create it

Adorable Gingerbread ornaments
Cinnamon Dough Ornament Recipe

2 C. flour

1 C. salt
5 t. cinnamon
3/4 to 1 C. water

Combine dry ingredients in a bowl. Stir in water gradually to make dough. (Tip: If it sticks to your hands - add more flour, If it crumbles - add water) Knead for 5-10 minutes until smooth. Refrigerate for 30 minutes. Roll out dough to desired thickness can range from 1/4 - 3/4 inch thick.


Note: The thicker the longer it will take to bake.


Use cookie cutters to create teddy bears, gingerbread people, and holiday shapes. Use a straw to make a hole so you can hang the ornament.


Baking: - Check After 45 minutes - 1 hour

Temperature: 325°F.
Time: 1 1/2 hours - varies based on thickness, bake until dry.

Let cool before you begin to decorate. Paint with acrylic paints. Glue on fun eyes, buttons, ribbon, or any fun accessory. Coat with acrylic varnish when everything is dry, this is optional.

My homemade stocking I made from a goodwill sweater..

Snow Globes...I have become obsessed and have made way too many..some have little animals in them :)


Saturday, November 3, 2012

Saturday Hair Do: Fishtail Braid

It's been over a month since I posted anything to the blog mainly because I have been pretty busy with school and working.  The holidays also keep me busy because I feel the need to make every single person in my family a handmade gift two months before Christmas. (I am very good at procrastinating,hehe)  Anyways, I have been wearing my hair in a fishtail braid a lot lately and I have had tons of people ask me how to do it, (even one of the ladies at the city office asked me), so I decided to share the video that taught me how to do it.  I hope this video is helpful!   

***Note*** I actually don't put an elastic around my hair to make a ponytail first, I find it easier and quicker to just pull your hair to the side like you're making a ponytail and go from there, but if you are particular about the sleekness, then you can follow the complete video instructions.

This is a tutorial by Lauren Conrad. :) enjoy!!


Tuesday, October 9, 2012

Tuesday Food For Thought: The best cozy meals...with a treat of course!

So today I have food on the brain (mainly cause I haven't eatin breakfast yet) and with this cold fall weather sneaking up on us, I decided the best thing to blog about would be cozy fall foods.  Now I am not much of a cook, (because I'm lazy) so most of these recipes will be pretty simple.  (Unless there is one that looks way too delicious not to post.) Everyone loves food so I am most certain that you will all, Enjoy! (I have a sweet tooth too, so there will be cake) (:

Chicken Taco Chili:
Crock Pot Chicken Taco Chili
Servings: 10

1 onion, chopped 
1 16-oz can black beans 
1 16-oz can kidney beans 
1 8-oz can tomato sauce
10 oz package frozen corn kernels (or 2 small cans of kernel corn)
2 14.5-oz cans diced tomatoes w/chilies ( or a 28 oz can of diced tomatoes)
1 packet taco seasoning 
1 tbsp cumin 
1 tbsp chili powder 
24 0z. (3) boneless skinless chicken breasts 
chili peppers, chopped (optional)
chopped fresh cilantro 
  
Combine beans, onion, chili peppers, corn, tomato sauce, cumin, chili powder and taco seasoning in a slow cooker. Place chicken on top and cover. Cook
 on low for 10 hours or on high for 6 hours. Half hour before serving, remove chicken and shred. Return chicken to slow cooker and stir in. Top with fresh cilantro. 
Nutritional facts: 202 Calories per 10 oz bowl

Enchilada Casserole:
  • Prep: 25 min. Bake: 30 min.
  • Yield: 8 Servings
253055

Ingredients

  • 1 pound lean ground beef (90% lean)
  • 1 large onion, chopped
  • 2 cups salsa
  • 1 can (15 ounces) black beans, rinsed and drained
  • 1/4 cup reduced-fat Italian salad dressing
  • 2 tablespoons reduced-sodium taco seasoning
  • 1/4 teaspoon ground cumin
  • 6 flour tortillas (8 inches)
  • 3/4 cup reduced-fat sour cream
  • 1 cup (4 ounces) shredded reduced-fat Mexican cheese blend
  • 1 cup shredded lettuce
  • 1 medium tomato, chopped
  • 1/4 cup minced fresh cilantro

Directions

  • In a large skillet, cook beef and onion over medium heat until meat is no longer pink; drain. Stir in the salsa, beans, dressing, taco seasoning and cumin. Place three tortillas in an 11-in. x 7-in. baking dish coated with cooking spray. Layer with half of the meat mixture, sour cream and cheese. Repeat layers.
  • Cover and bake at 400° for 25 minutes. Uncover; bake 5-10 minutes longer or until heated through. Let stand for 5 minutes; top with lettuce, tomato and cilantro. Yield: 8 servings.

Nutritional Facts
1 piece equals 357 calories, 12 g fat (5 g saturated fat), 45 mg cholesterol, 864 mg sodium, 37 g carbohydrate, 3 g fiber, 23 g protein.

Healthy Mozzarella Sticks:
What you need
  • 12 sticks of string cheese in your choice of cheese, go for the low sodium kind if you want to be extra healthy
  • 1 egg
  • 2 tbsp of flour
  • 5 tbsp of bread crumbs
  • 2 tbsp of parmesan cheese
  • A dollop of olive oil, or cooking spray

Preparation
  • Cut the cheese sticks in half, making 24 slices, then freeze the slices in the freezer until completely frozen
  • Beat the egg in a small bowl. Use a separate bowl to combine the bread crumbs and parmesan cheese
  • To bread the cheese sticks: First dip the frozen cheese stick into the flour, then into the egg, then into the bread crumb mixture
  • Once all of the 24 sticks are coated, place them on a baking sheet covered with aluminum foil coated with a few drops of olive oil or sprayed with cooking spray (this will keep cleanup to a minimum, and keep the sticks from sticking!)
  • Bake in the oven at 400 degrees for about 4 minutes, or until crisp. They need to be watched closely so they don’t melt completely!
What makes them healthier? They’re home cooked with less butter, they’re baked instead of fried, and cheese sticks are a naturally lower calorie cheese snack. You can also add italian spices or herbs to the recipe, adding them into the bowl with the breadcrumb mixture. Serve with marinara sauce and enjoy!

Southwestern Egg Rolls:
Southwestern Egg Rolls  (makes 48 mini rolls, or 24 regular rolls)
Ingredients:
For the egg rolls:
2 cups frozen corn, thawed
1-15 oz can black beans, rinsed and drained
1-9 oz package frozen chopped spinach, thawed and squeezed dry with paper towel
2 cups shredded Mexican cheese
1-7oz can diced green chiles, drained
4 green onions, finely chopped
1 tsp ground cumin
1/2 tsp chili powder
1 tsp salt
1/2 tsp cayenne pepper
1 package of egg roll or wonton wrappers
Preheat oven to 425F. Line 2 baking sheets with aluminum foil and spray lightly with cooking spray.
In a large bowl mix together corn, beans, spinach, cheese, chiles, onions, cumin, chili powder, salt and cayenne pepper. Using a small spoon, scoop a small amount of filling onto the wrapper. Starting at a corner, carefully start to roll the wrapper. When it’s slightly rolled, tuck in the two side and continue rolling to the last point. Wet your finger with water and dab a bit on the corner to seal the egg roll. Repeat with remaining wrappers and filling, placing them slightly apart on the baking sheet.
Lightly spray the tops of the egg rolls with cooking spray and bake for 15 minutes, flipping them at least once during baking.

Stuffed Bell Peppers:
6 large red peppers
4 sausages (chicken, pork, turkey...)
1 large onion
1 cup of halved cherry tomatoes
1 cup of brown rice
2 tablespoons of butter (or olive oil)
salt and pepper
Heat oven to 350-degrees.
Set one cup of brown rice to cook on the stove.
Chop up the onion and put it into a pan along with olive oil and cook on medium high heat until the onion begins to brown (around 5 minutes). 
While the onions are cooking cut a cup of cherry tomatoes into halves.
Once onions are starting to brown stir in tomatoes and cook for 2 minutes. Stir constantly. Remove from heat and set aside.
Now remove the sausage meat from the casing and break into small pieces. Cook meat for several minutes (until brown). Meat should be almost completely cooked though.
Combine rice, onion, tomato and sausage pieces in a large bowl and mix together. Add salt and pepper to taste.
Cut peppers in half and remove seeds.
Fill peppers with mixture and set into a glass casserole dish.
Bake for 30 minutes and enjoy!


No-Bake Cake Batter Truffles:

INGREDIENTS

  • 1/2 cup unsalted butter softened
  • 1/2 cup sugar
  • 1 1/2 cups flour
  • 1 cup yellow cake mix dry
  • 1 tsp. vanilla
  • 1/8 tsp. salt
  • 2 Tbsp. sprinkles
  • 16 oz white dipping chocolate
  • 4 Tbsp. yellow cake mix dry

INSTRUCTIONS

  1. Beat together butter and sugar using an electric mixer until combined. Blend in vanilla. Add cake mix, flour, salt, and vanilla and mix thoroughly. Add 3 Tablespoons of milk or more if needed to make a dough consistency. Mix in sprinkles by hand. Roll dough into one inch balls and place on a parchment or wax paper lined cookie sheet. Chill balls in the refrigerator for 15 minutes to firm up.
  2. While dough balls are chilling, melt almond bark in the microwave in 30 second intervals until melted. Stir between intervals. Once melted, quickly stir in cake mix until incorporated completely. Using a fork, dip truffles into almond bark and shake of excess bark by tapping the bottom of the fork on the side of your bowl. Place truffle back on the cookie sheet and top with sprinkles. Repeat with remaining balls until finished. {Note: for smoother looking truffles, don't add cake mix to melted chocolate, just leave it by itself}
  3. Chill cake batter truffles in the refrigerator until serving. Makes around 24-30 truffles.
All of these recipes were gathered from my pinterest account: http://pinterest.com/frostedcupcakes/

Sunday, September 30, 2012

Sunday Morning Crafts: DIY Jewelry

It's a gloomy Sunday morning (my favorite time of day)and I have to go to work at noon, (boo)...So I figured the best thing to do was to share some jewelry DIYs..(helps ease the pain of working on such a lovely gloomy Sunday)Enjoy!!

This bracelet can be a little difficult in the beginning, but once its started you will be glad you kept on going. For full instructions click on the link. http://www.ispydiy.com/2011/07/my-diy-chain-and-rhinestone-bracelet.html


The wire for this beautiful ring DIY can actually be bought at Walmart in the hardware section...it's a little difficult at first, but very much worth it.. For full instructions click on the link http://www.ispydiy.com/2012/04/my-diy-heart-ring.html 

This amazing DIY can also be made with hex nuts from the hardware store or of course Walmart :)  For full instructions click on the link http://www.ispydiy.com/2012/01/my-diy-rope-wrapped-chain-bracelet.html

I actually bought a ring exactly like this from Aerie, which makes me wish I had found this DIY a lot sooner..so easy and so cute! Follow the link for full instructions http://www.ispydiy.com/2012/07/my-diy-wire-bow-ring.html
I haven't tried this one yet, but I am excited about it!  Instead of the cord she uses in the tutorial, you can use leather cord and embroidery thread...here's the link http://typicalhousecat.com/2012/08/28/diy-fishtail-bracelet/

So it would seem, I'm a little obsessed with hearts...Too cute! Follow the link http://www.ispydiy.com/2012/06/my-diy-heart-bracelet.html

Wednesday, September 26, 2012

Wednesday Randoms

So today is my Sunday and as any true human being would do, I have sat around and done absolutely nothing (except crafts).....I found so many different crafts that I want to do (my thoughts are running around like a crazy person in my head)..So I figured it would be best to share all of these awesome, but random crafts..(before my head explodes)

DIY wooden words
So easy I almost don't need to put instructions...but I will :)
What you will need:
Wooden letters
Hot glue gun
paint
Heres how to do it:  Go to the craft section in walmart and pick out the letters to what ever word you would like to make, in the same isle choose your acrylic paint choice.  At home: put down something to protect the surface you plan on painting on, and then start painting each letter.  After the letters are dry (this may take a few hours) hot glue them together to create your word...they come with notches already in the back of them so all you have to is hang them where ever your heart desires..and Enjoy!!


DIY your computer bag strap or even your backpack straps.
All you need is some ribbon from walmart. (there are literally 100 different ones to choose from) I ordered the studs online, but if you like the studded look Walmart actually sells a leather like ribbon with studs already on it.  I hand sewed my ribbon on, but you can glue it on with fabric glue if you find it to be easier (although it may take longer to dry).  Do whatever your heart desires and as always...Enjoy!
Link to studs you can buy online:  http://studsandspikes.com/


Crayon Art:
This craft is super simple. Here's a list of supplies you'll need.
Box of crayons
Blowdryer
Hot Glue Gun
Canvas
This is how it's done:  place hot glue on crayons and place them on the canvas in what ever array you would like, take your blowdryer and put it as close to the crayons as you possibly can without touching them and turn it on high heat, going back and fourth across the crayons...watch them melt away into a beautiful photo of art...and Enjoy!!


I hope everyone enjoys these tutorials, sorry there are only three today but these are the few that I have recently done on my own.

I hope you all enjoy them!! 


Friday, September 21, 2012

Friday Favorites: DIY's


It's Friday, Yay!! But, it means nothing to me, I am more excited about Tuesday and Wednesday (my Saturday and Sunday) this makes Monday (everyone's favorite day of the week) my Friday, woo hoo! :)   Anyway, I happen to be off work today and spent the majority of it laying around and being completely lazy, and like most of my days off I rack my brain (and the internet) on what sort of crafts I can create and after a rough day of searching (about 10 mins) these are a few of my favorites for this week.  Your welcome!!


DIY: CREATE YOUR OWN COLORFUL VASE
Be Green, save your glass food jars and turn them into something beautiful!
http://blog.freepeople.com/2012/05/diy-mason-jars/


DIY CHALKBOARDS
The kicker is that they are colorful, not just black. makes me smile :)
http://blog.freepeople.com/2012/09/diy-chalkboard-paint-antique-frames/


DIY SUN JAR
http://blog.freepeople.com/2012/08/sun-jar-diy/


DIY ERASER STAMPS
http://blog.freepeople.com/2012/09/diy-eraser-stamps/


DIY SEWING KIT
http://blog.freepeople.com/2012/09/diy-mason-jar-sewing-kit/


These DIYs were found on one of my favorite blogs http://blog.freepeople.com/.  I hope everyone enjoys them!!
Click on the links below each picture to see each DIY.


Monday, September 17, 2012

Monday Blues

Not sure about anyone else, but I absolutely hate Mondays...Unless of course if my Birthday falls on one (it did this year, and oddly enough the day I was born)  Regardless, they suck and although today seems to be a short day for me at work, I am not wanting to go and hoping time will stop for a couple of hours (just long enough for me to WANT to do anything)...I decided to share some inspiring photos to get me going...


You are, Really!!


Always be as creative with life as much as you possibly can...

As always, good to know
What I pretty much do all day long...

Sunday, September 16, 2012

Sunday Evening Boredom

Need to do way more thinking per day....and people say I need to exercise..smh

 Love can make us do crazy things...

More exercise tips..from yours truly :)

So this is why I stay up late..because it makes me intelligent...I always thought it was because I was too lazy to go get ready for bed until I hit complete exhaustion...

See law makers....Marijuana is good for something..hmm

Well, I guess I should cuddle more..even though I can't stand being bothered while I am having difficulty trying to sleep

Maybe we should try the Marijuana to not only raise our IQ, but also ease our stress away......no brain freeze, except when eating Ice Cream..those are the best ones